In order for Security
Center to receive claims
from an ADFS server, you need to create and configure an ADFS role within Security
Center.
What you should know
Active Directory Federation Services (ADFS) is a component of the
Microsoft® Windows® operating system that issues and transforms claims, and implements
federated identity. It is also a type of role that enables Security Center to receive
claims from an external ADFS server.You need to create one ADFS role in
Security
Center for each root ADFS you have.
In our sample
scenario, your local ADFS server is your root ADFS, therefore you only need to
create one ADFS role.
In a situation where you do not have a local ADFS server,
but multiple independent third-party ADFS servers acting as security token services for Security
Center, then you need to create an ADFS role
for each of them, and add a relying party trust for Security
Center to each of these ADFS server's
configuration.
To create an ADFS role:
-
From the Config
Tool home page, open the
System task, and click the Roles view.
-
Click Add an entity (
 ) > Active Directory Federation
Services.
-
In the Basic information page, enter a name and description
for the role.
-
Select a Partition this role is a member of, and click
Next.
Partitions determine which Security
Center
users have access to this entity. Only users who have been granted access to the
partition can see the ADFS role.
-
Click .
A new ADFS role (

) is
created.
-
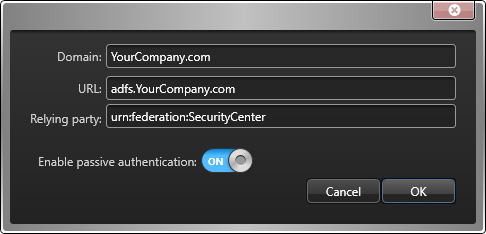
Click the Properties tab, and configure the Trust
chain (domains).
-
Click Add an item (
 ), configure the ADFS server, and click
OK.

Domain:
This is your local ADFS server's domain. Example:
YourDomain.com.
URL:
This is the address of your ADFS server's metadata document. It is
always in the following format:
adfs.YourCompany.comReplace
YourCompany.com with the name of your
ADFS server.
Relying party:
This is the identifier that was entered as the
Relying
party identifier when you
added the relying party
trust for Security
Center.
This is how Security
Center identifies itself
as the relying party to the ADFS server, even when the role fails
over to another server.
Enable passive authentication:
Select this option to enable
passive authentication (default=OFF).
IMPORTANT: Supervised user logon would not work if you enable
passive authentication. This is because the user authentication is
handled outside of Security
Center.
-
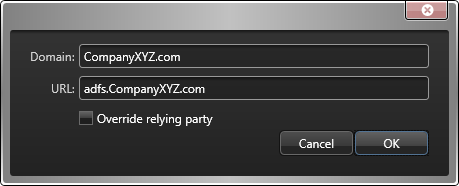
Click Add an item (
 ), configure the remote ADFS server, and click
OK.

Domain:
This is your remote ADFS server's domain. Example:
CompanyXYZ.com.
Users from that domain must append the domain to their usernames when
they log on to Security
Center.
Example: johnny@CompanyXYZ.com.
URL:
This is the address of the remote ADFS server's metadata document. It
is always in the following format:
adfs.CompanyXYZ.comReplace
CompanyXYZ.com with the name of the
remote ADFS server.
Override relying party:
(Advanced setting) Select this option if the claims provider on this
domain expects a different audience in the token request made by the
relying party, and enter the value it expects.
-
If you configured more than one remote ADFS servers as claims providers to
your local ADFS server, add them now.
-
Configure the external user groups that Security
Center is going to accept.
-
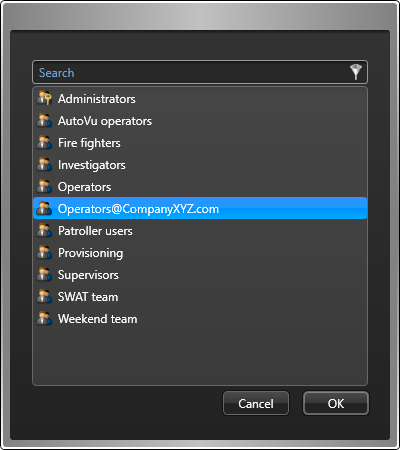
In the Accepted user groups section, click
Add an item (
 ).
).
-
In the dialog box that opens, select the user groups mapped to the remote
ADFS groups, and click OK.
All users who are members of the accepted user groups would be able to log on to
your system. They must all append their domain name after their username in order to
log on. Security
Center does not keep nor
validate their passwords. The ADFS server does. Security
Center simply trusts them as authentic
users if the ADFS accepts them.
-
Click Apply.


