You can search for, review, modify, and delete reported incidents and incident
packages, using the Incidents task.
What you should know
If you previously reported an incident, but must edit its content (for example, modify
the description, or add another camera to the report), you can search for that report using
the title you wrote while creating it. Or, if you remember what camera you wrote the incident
for, you can search by specific camera. If you want to search for all the noteworthy activity
that was logged by other users during the last week, or since your last shift, you can search
for those incidents by setting a time range.To modify an incident report, you need the
Modify reported incidents privilege. To delete an incident report, you need the
Delete reported incidents privilege.
To review, modify, or delete a reported incident:
-
From the home page, open the Incidents task.
-
Set up the query filters for your report. Choose one or more of the following
filters:
Title:

Restrict the search to incidents containing
specific text in their title.
Category:
If incident categories are created, restrict
the search to specific categories.
Creation time:
Incidents created or reported within the
specified time range.
Description:
Restrict the search to entries that contain
this text string.
Incident time:
Incidents reported within the specified
time range. The incident time corresponds to the event or alarm
timestamp the incident refers to. If the incident does not refer to any
event or alarm, then the incident time corresponds to the creation
time.
Modification
time:
Incidents modified within the
specified time range.
References:
Incidents referencing all the selected
entities.
Custom fields:
Restrict the search to a predefined custom
field for the entity. This filter only appears if custom fields are
defined for the entity, and if the custom field was made visible to you
when it was created or last configured.
-
Click Generate report.
The reported incidents and incident packages are listed in the report
pane.
-
To review an incident and show the corresponding video in a tile, double-click or drag
the item from the report pane to the canvas.
If there is no camera attached to the incident, the Edit
incident dialog box opens. If you select an incident package, the video
sequences are played back within a single tile in the order that they were recorded, and
entities that were added as additional resources are displayed in different
tiles.
-
If you are viewing video from an incident package, you can control the playback from
the Video sequences widget in the Controls pane, as
follows:
- To switch to another camera in the package, select a camera the drop-down
list.
- To jump to the next or previous cameras in the package, click Next
sequence (
 ) or
Previous sequence (
) or
Previous sequence ( ).
).
- To jump to a specific moment in time, move your cursor to that spot on the
timeline.
-
Modify or delete the incident as follows:
-
Select an incident in the report pane.
-
At the bottom of the report pane, click Edit (
 ) or Delete (
 ).
).
-
If modifying, in the Edit incident dialog box, edit the
incident description.
-
From the Category drop-down list, change the incident
category.
-
In the References section, click
 or to add or
remove referenced entities.
or to add or
remove referenced entities.
-
In the Video sequences section, you can do the
following:
- Edit the time ranges of the video sequences included in the incident
report.
- To add another camera to the package, click Add an item
(), select a camera and the time range, and
click Add.
- To protect the video sequences, select the Protect video from
deletion option.
-
To save the report, do one of the following:
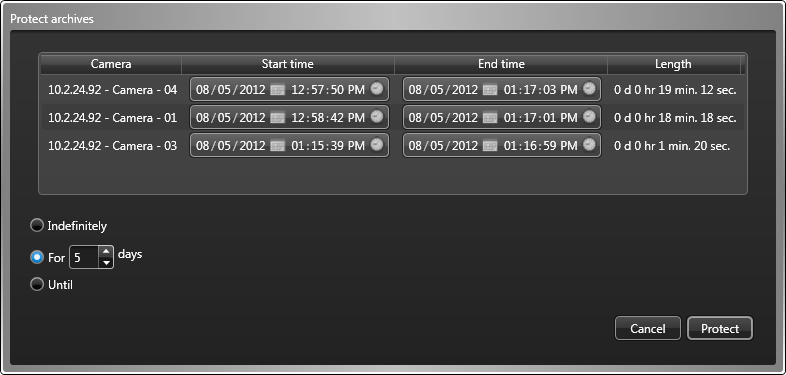
If you chose to protect the video sequences that are included in the report,
then the Protect archives dialog box opens.
-
In the Protect archives dialog box, set the Start
time and the End time for the video that you want to
protect.
-
Select how long to protect the video file from one of the following options:
Indefinitely:
No end date. You must manually remove the protection by selecting the video file
in the report pane, and clicking
Unprotect (

).
NOTE: If
the retention period has passed, unprotected video files are not deleted
immediately. If needed, you have 24 hours to restore the video protection. For information about archive storage, see the Security
Center Administrator
Guide.
For x days:
The video file is protected for the selected number of days.
Until:
The video file is protected until the selected date.
-
Click Protect.
If you cancel your changes in the Protect archives dialog box,
the incident report is still saved.
The updates you made to the incident report are saved in the database. If you selected a
user, the incident report is sent to them by email.