You can add live and playback video to a tile, and then saving the information as an
incident package. This is helpful when you want to report a situation and build a
case.
What you should know
When incident recording is turned on, the live or playback video related to any entity
that is placed in the tile (cameras, areas, doors, cardholders, and so on) is recorded. Entity
cycling inside the tile is supported. Cameras that are placed in the tile start recording if
they are not already recording.You can export the related video sequences as a single G64x
file. The G64x file can be played back in Security Desk, or in the Genetec™ Video
Player.
You can create multiple incident packages
simultaneously.
To create an incident package:
-
To make sure that the tile contents are not overwritten when new events are received in
Security
Desk, turn off monitoring for
that tile as follows:
-
In the Monitoring task, select the tile in the canvas.
-
In the tile widget, click Monitoring (
 ).
).
-
Click Monitor alarms and Monitor
events to make sure you turn off all monitoring for the tile.
TIP: When monitoring is turned off for a tile, the tile ID background
turns black.
-
Right-click inside the tile that is displaying the camera where the incident is
happening, and then click Start incident recording (
 ).
).
The tile is outlined in red.
-
To build your case, add other cameras, or entities that have attached cameras, to the
tile.
The sequence is created in the order that you add a new cameras and entities, and can
be adjusted afterwards.
-
Right-click inside the tile, and click Stop incident recording
(
 ).
).
-
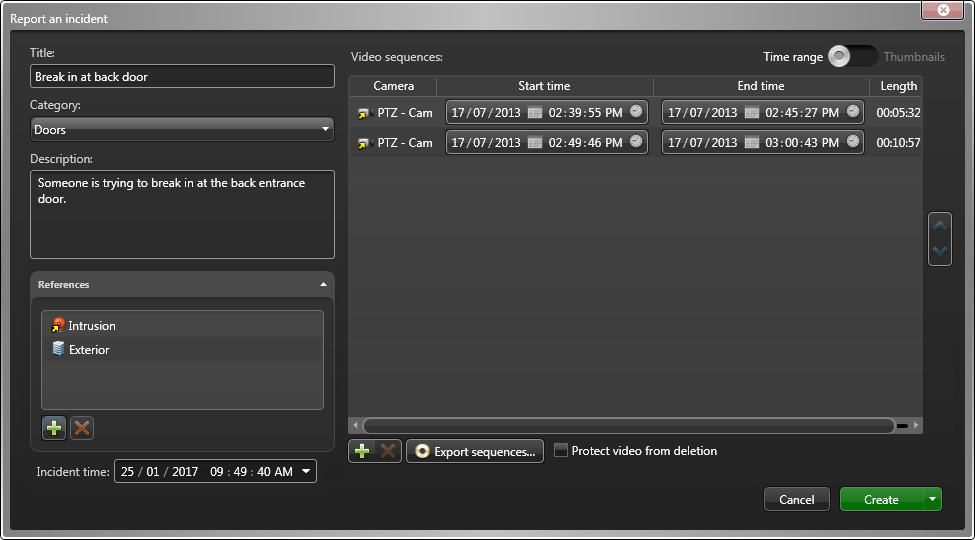
In the Report an incident dialog box, type a
Title for the incident.
-
From the Category drop-down list, do one
of the following:
- Select a category for the incident.
- If no categories exist, then click (
 ), type a name for the category, and
then click .
), type a name for the category, and
then click .
-
In the Description section, describe the
incident.
The description you add is searchable in the Incidents
task.
-
In the References section,
click to add other entities as supporting
information.
All the entities related to what you were viewing in the tile are added by default. If
you are viewing an alarm, both the alarm and the alarm source (the entity that triggered
the alarm) are added by default.
-
In the Video sequences
section, you can do the following:
- For each camera, edit the time range of the video sequence you want to include in
the incident report.
For example, one of the cameras might only have two minutes of
video that relates to the incident.
- To add another camera to the package, click Add an item (), select
a camera and the time range, and click Add.
Adding additional cameras is helpful if you forgot to place one of the cameras
in the tile while it was recording the incident.
- To protect the video sequence, select the Protect video from
deletion option.
-
Create the incident package one of the following ways:
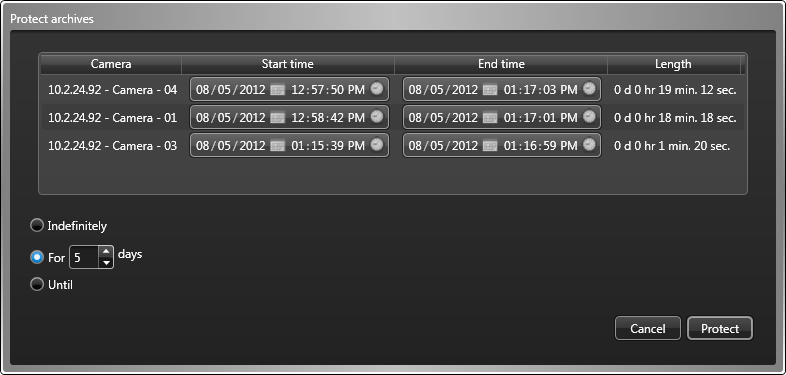
If you chose to protect the video sequences that you added to the incident
package, then the Protect archives
dialog box opens.
-
In the Protect archives dialog box, set the Start
time and the End time for the video that you want to
protect.
-
Select how long to protect the video file from one of the following options:
Indefinitely:

No end date. You must manually remove the protection by selecting the video file
in the report pane, and clicking
Unprotect (

).
NOTE: If
the retention period has passed, unprotected video files are not deleted
immediately. If needed, you have 24 hours to restore the video protection. For information about archive storage, see the Security
Center Administrator
Guide.
For x days:
The video file is protected for the selected number of days.
Until:
The video file is protected until the selected date.
-
Click Protect.
If you cancel the protection settings in the Protect archives dialog box, the incident
package is still created.
The incident package is saved in the database for reporting purposes. If you selected a
user, the package is sent to them by email.
After you finish
After the incident package is created, you can send it to authorities or other users,
or review it a later time using the Incidents report.