You can add and reconcile MLPI license plate reads from an offload file to a parking
facility inventory, using the Inventory management
task.
Before you begin
Before adding the data from an offload files to an inventory, you can remove
unreconciled plate reads from the offload, using the Inventory Report
task.
What you should know
You must know the following about creating
inventories:
- When new MLPI plate reads are available in the database, a notification appears
on the Inventory icon (
 ) in the
notification tray. The inventory alert is updated every 10 minutes. You can also
update the alert by right-clicking the Inventory icon, and clicking Refresh.
- You can only create one parking facility inventory at a time.
- If a Genetec
Patroller™ offloads multiple times before an inventory is created, they are
all grouped in a single entry.
- You cannot set the start time of an inventory. The first time you create an
inventory, the start time is undefined. The next time you create an inventory,
the start time is the end time of the previous inventory.
- Reconciling is when a read is confirmed and added to an inventory. If there is a
conflict while reconciling a read to an inventory (for example, two vehicles
with the same plate numbers, but from different states), you might have to
manually confirm the read.
- A partial inventory is when you perform a spot check on an inventory at a
specific time, and the reads are not reconciled with the previous inventory.
This is useful if Genetec
Patroller™ is unable to perform a complete sweep of a parking
facility. For example, if there is a heavy snowfall and Genetec
Patroller™ can only sweep
half of the parking lot because the other half has not been plowed, a partial
inventory can be created so the reads are still recorded.
To create a parking facility inventory:
-
From the home page, open the Inventory management task.
NOTE: The Offloads panel only
contains information if an offload file has been duplicated and stored in
the LPR Manager database.
The
Offloads panel includes the
following information:
Genetec
Patroller™:

Name of the
Genetec
Patroller™ unit that performed the offload.
NOTE: A single ghost patroller, called XML
import, is displayed for reads that were taken by a handheld
device, because they were imported to the LPR Manager database
using the XML import module.
First seen:

Timestamp of the first read in the offload.
Last seen:

Timestamp of last read in the offload.
Read count:

Number of reads in the offload.
-
From the Parking facility drop-down
list, select the parking facility you want to add the inventory to.
-
Click Create inventory.
-
In the Create inventory
dialog box, type the name of inventory, and the end time.
-
If you want to create a partial inventory, select Partial.
-
Click Create.
The plate reads are reconciled and the plate read data is added to the
parking facility inventory.
-
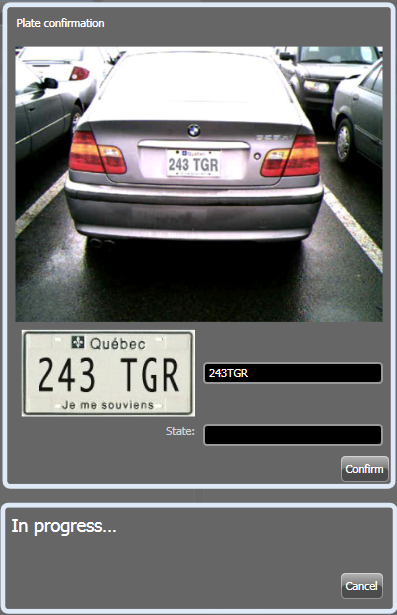
If there is a conflict while the reads are being reconciled (for example, a
license plate appears in two locations), then the Plate confirmation dialog box
opens, and you must verify that the license plate in the context image is the
same as the plate image and OCR read as follows:
TIP: You should only compare the LPR image and the OCR read,
because the plate in the context image might be difficult to
see.

-
If the OCR reading is incorrect, type the correct license plate number
in the OCR
reading box.
NOTE: This plate read is tagged as Edited in the
Inventory report task.
-
If the OCR reading is correct, but the plate state is different, enter
the state name in the State box.
You can enter the state abbreviation or full name.
-
Click Confirm.
The data from the offload is added to the parking facility
inventory.
-
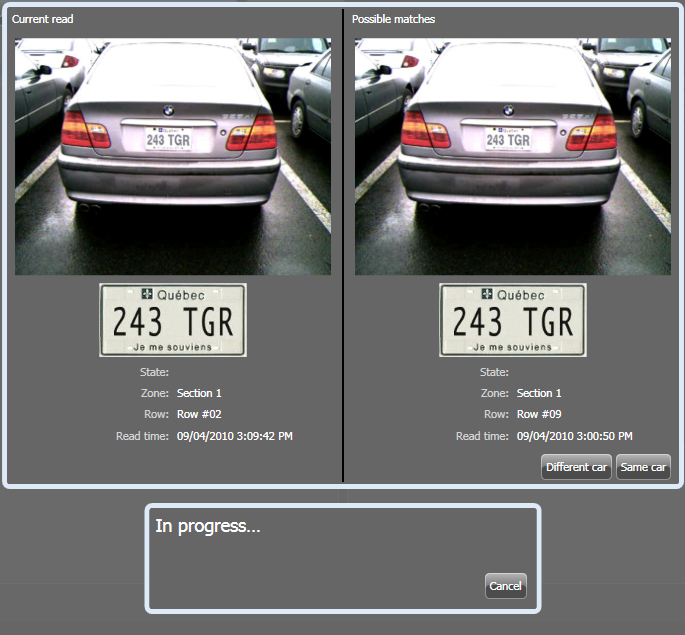
If a conflict is detected during the inventory process (for example, a license
plate appears in two locations), then a dialog box opens that displays the plate
read in the current parking facility inventory (Current
read), and the possible plate match (Possible
matches) in the data it is trying to reconcile to that
inventory.

Select one of the following:
Different car:

Select if the plate numbers are the same, but the plate state
and the vehicle are different from the vehicle in the current
inventory. The vehicle displayed under Possible
matches is added as a new vehicle in parking
facility inventory.
Same car:

Select if the plate numbers, state, vehicle are the same, but
the vehicle has moved locations since the last inventory was
taken.
Cancel:

Cancel the reconciliation. If the conflicts are not reconciled,
a new plate read is created which says that a new vehicle
arrived (as opposed to marking the same vehicle down for an
additional day), and it is considered a Different
car.
A message appears warning you that the operation was
cancelled. Click OK.
The inventory you cancelled appears in red under Existing inventories,
but the offload data remains in the Offload folder until it is added or
removed from the parking facility.
-
If there are any cancelled inventories, you must delete them before you can
create another inventory as follows:
-
In the Existing inventories
panel, select the cancelled inventory (in red).
-
Under the Existing inventories
panel, click Delete (
 ).
).

