You must link an Archiver to the LPR Manager to store the LPR images that are
associated with the reads and hits.
What you should know
If you need to manage both LPR and video data, we recommend that you create separate
Archiver roles, each handling only one function.Each Archiver role must store video on a
separate drive or partition from other Archiver roles. If you are unable to have separate
Archiver roles, you can manage both LPR and video data with the same Archiver. Note that by
default, the Archiver deletes the oldest files when its disks become full. This means that
LPR images might be deleted before their retention period is over. This does not affect LPR
metadata or the protected events and images.
To create an Archiver role for LPR:
-
From the Config
Tool home page, open the
Video task.
-
Click the menu button beside Video unit (
 ), and then click Archiver (
 ).
).
The role creation wizard window opens.
-
On the Specific info page, set the following fields, and then
click Next.
Server:

This is only shown if you have more than one server in your system. If the LPR
Manager is hosted on its own server, we suggest using the same server to host the
linked Archiver role. Make sure you have enough free space on disk to store the LPR
images. We recommend using a server where it is possible to configure the Archiver
role with its dedicated local disk or disk partition.
Database server:

Name of the SQL Server service (default=(local)\SQLEXPRESS). If
the Archiver is hosted on the same server as the LPR Manager, we recommend using the
same database server for both.
Database:

Name of the database instance (default=Archiver). We suggest
using LPR_Archiver to differentiate it from video archive
databases.
-
On the Basic information page, set the following fields, and then
click Next.
Entity name:

Name of the Archiver role (default=
Archiver).
We suggest using
LPR_Archiver to differentiate it from the Archiver role for
video.
Entity description:

Role description. If this Archiver role is shared by many LPR Manager roles, list
them here.
Partition:

This is only shown if you have partitions defined in your system. Make sure you
create this Archiver in the same partition as the LPR Manager it is linked to. Only
users who have access to the selected partition can view the LPR data managed by
these roles.
-
Verify that the information displayed in the Creation summary page
is correct, and then click Create.
-
Click Close.
-
From the Archiver role's Resources tab, configure the archive
storage settings.
IMPORTANT: Ensure you are not using the same disk
as another Archiver role in your system, and that you have enough disk space for
storing the LPR images. For more information on the storage requirements for LPR
images, refer to the Security
Center
Release Notes.
NOTE: The Archiver follows the Hit and Read image
retention period set for the LPR Manager. If multiple LPR Manager roles
are linked to the same Archiver, the LPR Manager with the longest image retention period
has precedence. This means that the image data might be kept longer than necessary for
some LPR Manager roles, but it does not affect the LPR metadata nor the LPR reports. No
LPR data beyond the specified retention periods appear in reports.
-
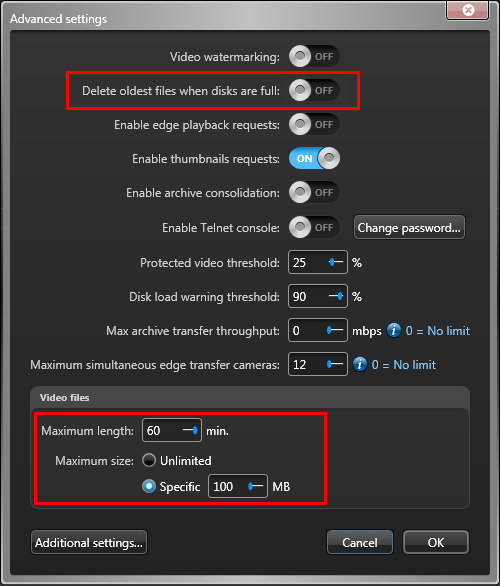
Click Advanced settings, and optimize the settings for storing
LPR image data.

The recommended values are:
Delete oldest file when disks are full:

OFF (default setting for video is ON).
Maximum length:

60 minutes (default value for video is 20 minutes).
Maximum size:

100 MB (default value for video is 500 MB).
-
Click .
-
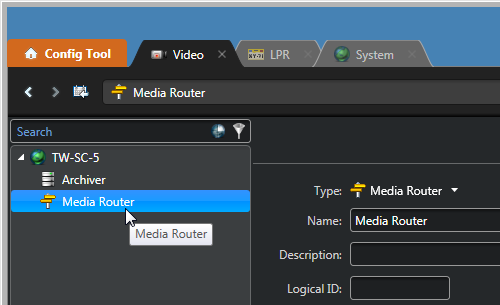
In the entity browser (left pane) of the Video task, make sure
that the Media Router role is running.
-
Click Media Router and configure the ports, redirectors, and
network cards to make sure that the Archiver can deliver the LPR images to all client
workstations on your system.
If all your servers are on the same network, and all your servers have only one
network card, the default settings should work without any change.


