To store the LPR images that are associated with the reads and hits, you must add the
Sharp camera to the Archiver.
Before you begin
- Set up the
Archiver role for LPR.
- Log on to the camera's web portal and change the default password.
- By default, SharpV units include a self-signed
certificate that uses the common name of the SharpV (for example, SharpV12345). To add the SharpV
to the Archiver, you must generate a new certificate (signed or self-signed) that uses the
camera’s IP address instead of the common name.
What you should know
- By default, the Archiver uses the H.264 stream from SharpV cameras. If you want to use the MJPEG stream, you
can select it in the Video task from the SharpV camera's screen.
- Information on context cameras is not applicable to SharpV ITS cameras.
To manually add a camera to a Security
Center Archiver:
-
From the Config
Tool home page, open the
Video task.
-
Click .
The
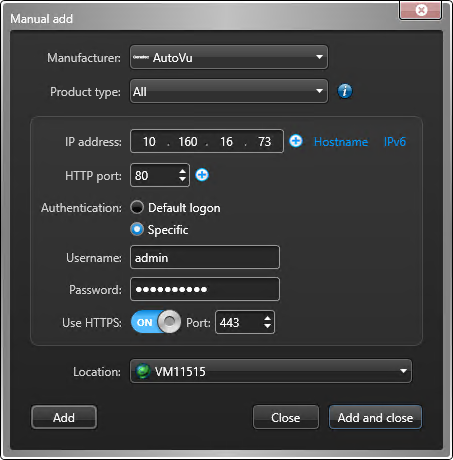
Manual add dialog box opens.
-
If you have multiple Archiver roles, select one to manage the unit from the
Archiver drop-down list.
-
From the Manufacturers drop-down list, select
AutoVu™.
-
From the Product type drop-down list, select
All.
-
Enter the static IPv4 or IPv6 IP address of the camera.
TIP: To add multiple units in a single operation, enter a range (

) of IP addresses .
-
Enter the HTTP port for the camera (default = 80).
NOTE: If the camera uses HTTPS, enter the HTTP port (80) here. You will enter the HTTPS
port in the following steps.
-
Select the Authentication method for the camera.
Default logon:

The camera uses the default logon defined for the Archiver in the
Extensions tab. Using this method, you can define the same
logon credentials for multiple cameras.
IMPORTANT: You cannot use the
default logon when adding a SharpV
camera. You must use the credentials you configured when you first logged on to
the SharpV portal.
Specific:

Enter the logon credentials for the camera. Turn on
Use
HTTPS if you have applied a certificate.
NOTE: Sharp cameras running SharpOS 12.7 or later must use HTTPS
communication.
-
From the Location drop-down, assign the camera to an area
entity.
-
Click Add.
The notification tray displays the message "Adding unit started". If successful,
it displays the message "Unit added successfully".
The camera is added under the selected Archiver.


