For AutoVu™ Managed Services (AMS) systems that are hosted on Microsoft’s Azure cloud platform, installing the Hotlist Permit File Updater plugin lets you push updated hotlists and permits to the cloud where they can then be downloaded on patrol vehicles.
What you should know
To install and configure the Hotlist Permit File Updater plugin:
- Download the Hotlist Permit Updater package, which is available at http://downloadcenter.genetec.com/products/AutoVu/Tools/HotlistPermitUpdater.zip.
- To install the plugin, open the Hotlist Permit Updater package and double click the Genetec.CS.HotListPermitFileUpdater.Setup MSI file and follow the instructions in the installer.
-
Restart the Security
Center Directory role, as follows:
-
From a web browser, open Server
Admin typing
http://<server>/genetec. -
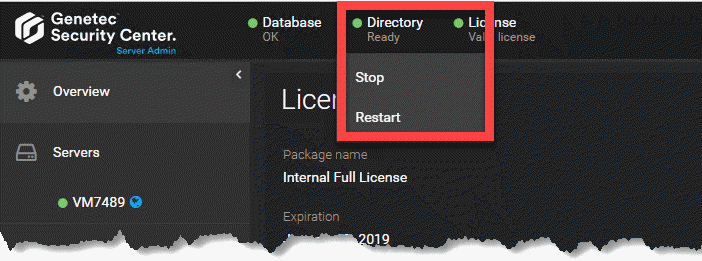
Click Directory and select
Restart.

- After the Directory restarts, close Server Admin.
-
From a web browser, open Server
Admin typing
-
Create the required custom events.
- From the Config Tool, open the System task, click the General settings view, and click the Events page.
-
Click Add an item (
 ).
).
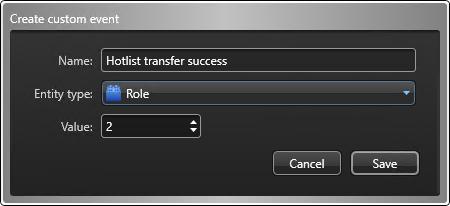
- In the Create custom event dialog box, enter the Name Hotlist transfer success.
- From the Entity type drop-down list, select Role.
-
In the Value field, type a unique number to identify this
custom event from other custom events.
NOTE: These values are not related to the logical IDs of entities.
-
Click
Save
> Apply
.

-
Using these steps, create two additional events:
- Hotlist transfer failure
- Hotlist start transfer trigger
-
Install the Raise custom event macro so that Security
Center can trigger the custom events.
- From the Config Tool home page, open the System task, and click the Macros view.
-
Click Macro (
 ), and name the new macro Raise custom event.
- Click the Properties tab.
- Click Import from file, navigate to the RaiseCustomEventMacro TXT file that is included in the package, and click Open.
The TXT file contains the following script:// ========================================================================== // Copyright (C) 2013 by Genetec, Inc. // All rights reserved. // May be used only in accordance with a valid Source Code License Agreement. // ========================================================================== using Genetec.Sdk; using Genetec.Sdk.Entities; using Genetec.Sdk.Entities.CustomEvents; using Genetec.Sdk.Queries; using Genetec.Sdk.Scripting; using Genetec.Sdk.Diagnostics.Logging.Core; using System; using System.Collections.Generic; using System.Data; using System.IO.Ports; using System.Linq; using System.Text; using System.Threading; namespace RaiseCustomEvent { public class RaiseCustomEvent : UserMacro { public int CustomEventId { get; set; } public RaiseCustomEvent() { CustomEventId = 0; } public override void Execute() { try { if (CustomEventId > 0) { Sdk.ActionManager.RaiseCustomEvent(new CustomEventId(CustomEventId), SdkGuids.SystemConfiguration); } } catch (Exception) { } } protected override void CleanUp() { } } }- Click Apply to save the macro.
- Click the Default execution context tab.
- In the Custom event ID field, enter the Value that you configured for the Hotlist start transfer trigger event.
-
Click Apply.

-
Create a scheduled task to start the file transfer.
- From the Config Tool home page, open the System task, and click the Scheduled tasks view.
-
Click Scheduled task (
 ).
A new scheduled task entity is added in the entity list.
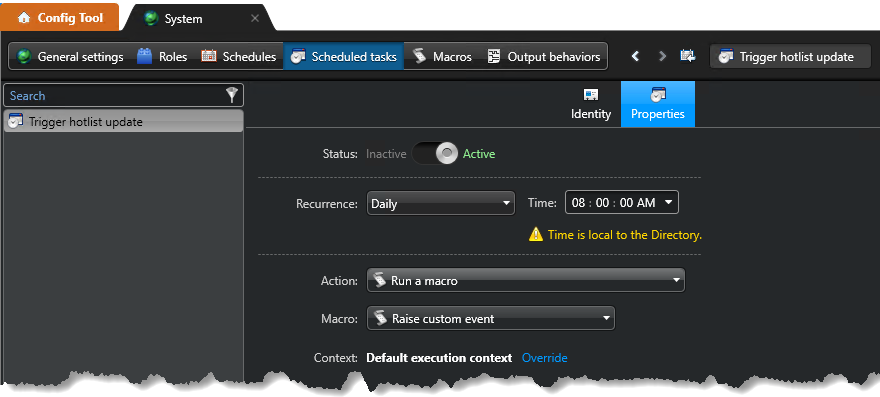
 - Name the task Trigger hotlist update.
- Click the Properties tab, and set the Status option to Active.
- Set the Recurrence of the task, for example, daily at 8:00 AM.
- From the Actions list, select Run a macro.
- From the Macro list, select the Raise custom event macro you created.
-
Click Apply.

-
Install the Hotlist permit file updater macro.
- From the Config Tool home page, open the Plugins task.
-
Click Add an entity (
 ) and
select Plugin.
- From the Creating a role wizard, install the Hotlist Permit File Updater plugin.
- The Hotlist Permit File Updater is added to the plugins list. Select it and click the Properties tab.
-
Configure the plugin to use the HTTP, FTP, or SFTP transfer method
HTTP or FTP:
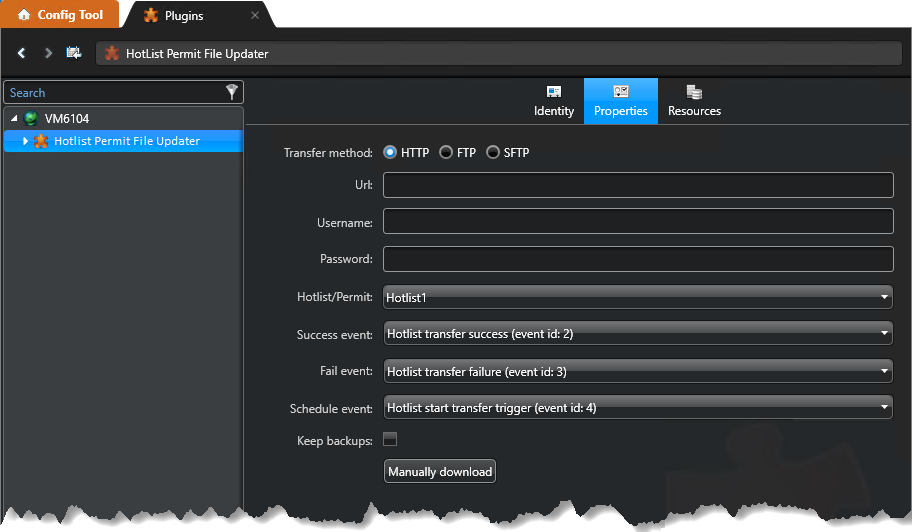
- Enter the remote URL where the file to download is located. Enter the credentials if needed. If the source is not secured using a username and password, leave the fields blank.
SFTP:
- Host: Enter the host using the following formatting:
sftp://(hostname or IP):(port)sftp://(hostname or IP)If you do not specify a port, the default port 22 is used.(hostname or IP)If you do not specify a protocol, the host name uses SFTP.
- File path: Enter the file path of the hotlist or permit.NOTE: The file path is relative to the home directory of the connected user on the SFTP server.
- Connection mode: Select the connection mode according to the SFTP site
configuration and enter the Username,
Password, and Certificate path
according to your selection.NOTE:
- The certificate must be located on the server on which the plugin is running and not the computer on which Config Tool is used.
- The path must also reflect the location of the file on the server.
- The certificate file should contain a private key in an OpenSSH format.
- SSH-2 keys are supported. SSH-1 keys are unsafe and are not supported by the OpesSSh format.
- From the Hotlist/Permit list, select the hotlist or permit you want to push to the patrol vehicles.
- From the Success event list, select the Hotlist transfer success event you created.
- From the Fail event list, select the Hotlist transfer failure event you created.
- From the Schedule event list, select the Hotlist start transfer trigger you created.
-
If you select Keep backups, the system creates a backup of
the current hotlist or permit file before downloading the new one. The file name uses
the original name + the current date and time + the .bak extension, for example,
hotlist2.tbl hotlist2.tbl 11-22-2017 11h10m55.bak.
NOTE: To trigger the download immediately, click Manually download.
-
Click Apply.

